A Culinary Experiment!

Documenting the ups and downs of our first CSA experience...
and our attempt to be more conscious of all things local!

Beets and Carrots in a Lime Vinaigrette

>> Wednesday, June 30, 2010

I've never really been a big fan of beets, but I decided to give them a try again by making them at home. We saved our beets from the last time we got them from the farm, and I got more today so I was able to use a lot of them! I discovered once I cut into them that today's beets were actually striped, which I think is pretty cool. I wish I had taken a photo of them cut open. I'll do so if we ever get them again! I think they might have been chiogga ("candy-striped") beets, but I'm not sure. Anyone know if there are other varieties of striped beets?

Anyway, here's the recipe I made tonight (we're going to have it as a side dish tomorrow for dinner, but I was afraid that it might not look as pretty by then because of the beet juice...):

Beets and Carrots in a Lime Vinaigrette (Red Fire Farm)

INGREDIENTS:

- 2 medium beets, peeled and cubed
- 2 medium carrots, sliced diagonally
- 1 medium cucumber, cubed
- 6 Tbs veggie oil
- 3 Tbs lime juice
- 2 Tbs chopped cilantro or dill
- 1 garlic clove, minced
- salt to taste

PREPARATION:

1. Steam beets and carrots separately until tender.*
2. Combine dressing ingredients (they suggested that a jar works well because you can put the lid on and shake it all up.)
3. Put the veggies, including the cucumber in a bowl and toss with dressing. Chill.

Before adding the dressing:

All finished!

* As you can see below, I like to steam my veggies in a pot with a steam basket. I found this great silicone one that molds to the shape of just about any pot - you can probably find it at most housewares stores. (you can also steam veggies in the microwave - put just a little water in the bottom of a bowl and cover with plastic wrap. I'm guessing that this way is not as nutritious, but I don't really know for sure... and I do this when making frozen veggies)

Finally, here are a bunch of other recipes I considered making before selecting this one:
Oh, and if we ever get golden beets, I want to make this recipe!

Read more...

This Week's Share - 6/30/10

This is what was available at our pick-up location today:

  • Beets
  • Cucumbers
  • Summer Squash/ Zucchini
  • Lettuce
  • Pearl Onions
  • Spinach
  • Carrots
  • Herbs
  • Kale or Collards
  • Cabbage or Broccoli
J decided to take the broccoli, basil, and kale, and we took the pearl onions, lettuce, and carrots. The rest of the items we split.

I was able to go to today's pick-up, so I took a photo for you to see what it actually looks like when we get the share (sorry, random people who ended up in the picture - I was trying to be quick about it):


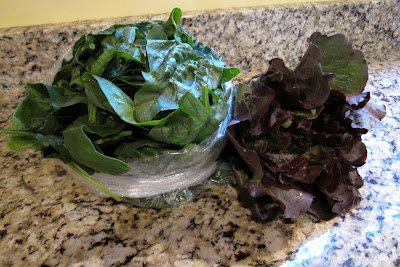
Some photos I took when I got home:

Read more...

Kohlrabi


I realized that I've fallen behind in my explanation of vegetables! We'll have to remedy that right now.

Simply Recipes has a great selection of ideas for how to cook kohlrabi. Here's their description of it: These little sputnik-shaped vegetables come in green or purple, can be eaten raw or cooked, and taste a lot like broccoli stems. The word kohlrabi is German for cabbage turnip (kohl as in cole-slaw, and rübe for turnip) though kohlrabi is more related to cabbage and cauliflower than to root vegetables.

Wikipedia has this to say about kohlrabi: The taste and texture of kohlrabi are similar to those of a broccoli stem or cabbage heart, but milder and sweeter, with a higher ratio of flesh to skin. The young stem in particular can be as crisp and juicy as an apple, although much less sweet.

We really enjoyed it and will definitely look for it again in the future! It tasted like broccoli or cauliflower to me when it was raw, but was much sweeter when we cooked it. I agree with the description from Wikipedia! I'd be curious to try the green variety sometime, I've heard that it has a different flavor.

This photo is so funny, I had to post it for you (it's from Simply Recipes) -


Read more...

Not-So-Healthy But Super Tasty Nachos

>> Tuesday, June 29, 2010

As I'm sure you've guessed from my previous posts, Dan and I tend to eat pretty nutritious meals most of the time. But sometimes you just have to give in to those cravings for comfort food, and nachos are one of our favorite "guilty pleasures."

We've "perfected" our recipe enough that now when I order them in restaurants, I usually find I don't like them as much as the ones we make at home. That's gotta be a good thing, right? Besides, I tell myself that these have to be healthier than what I'd get in a restaurant, just by the sheer fact that we're making them ourselves!!!!

We decided to make them last night using a few of our remaining CSA ingredients from this week - we were able to include pearl onions and cilantro! Here's what else we used:

- Green and red peppers, chopped
- Morningstar Farms Grillers Crumbles
- Wegman's* Garlic Lime Salsa
- Black beans
- Nacho chips
- Reduced-fat 4-Cheese Mexican Shredded Cheese


We use Morningstar Farms Grillers fairly often, but we've discovered that they taste A LOT better when you combine them with some sort of liquid. In this case, we mixed the salsa and the Grillers together, and then heated them briefly before adding them to the nachos.

We've also found that the best way to make this dish is to do it in layers - we started with a layer of chips, then a layer of the Grillers/salsa mixture and black beans.


Then we added another layer of chips, topped with the peppers, onion and cilantro (which we mixed together beforehand).


Cover with shredded cheese, and bake for 10 minutes at 400 degrees. Voila!


I do love how colorful the end result was... and if you don't want to eat so many nacho chips, we've also made this recipe by creating a "dip" of all of the ingredients and then putting it on top of just a few chips.

* PS - We LOVE Wegmans. The grocery store chain started in upstate NY, where we both went to college. There was a rumor that they were opening a few stores in the Boston area, but it has been on hold for a while because of liquor license issues. According to this article, they are still planning to come to our area next year or in 2012. I can't wait!

Whenever we're near a Wegmans, we always stock up on a few products, especially this particular salsa. It's great! NPR had a story about Wegmans a few months ago - you can read it here. Oh, and they were listed as the #3 company to work for in this year's 100 Best Companies from Fortune Magazine.

Read more...

R & J - Kohlrabi Ham Souffle

Here's the recipe. R said was "amazing."

I don't eat ham, but it looks really tasty for those of you who do - enjoy!

Read more...

Swiss Chard, Scallion and Garlic Frittata

>> Monday, June 28, 2010

Egg dishes are another staple in our household. Because of this, we often try to limit the number of whole eggs we use when cooking. We've discovered that if you replace some of the egg with just whites, you usually don't notice the difference. (I find that it's a lot easier to separate the whites from the yolks if you use a separator - they're really cheap and you can find them at most stores that carry housewares.) If you find that this dish is not flavorful enough, feel free to use all whole eggs. Just lower the amount accordingly...

Frittatas are really simple, and they're great because you can use any combination of ingredients you'd like. I'm a breakfast person, I would eat it for every meal if I could, so to me this is the perfect dinner-time dish. If you ask my sister though, she'd think you were crazy! She doesn't like eating breakfast in the morning, so she'd hate this meal as supper. To each his (or her!) own - you decide for yourself.

I didn't list the amounts of most of these ingredients because we were making it up as we went along, but it really doesn't matter... oh, and the first four ingredients below came from our CSA!


INGREDIENTS:

- Swiss chard, leaves and stems separated and chopped
- Garlic scapes, chopped
- Scallions, chopped
- Parsley, chopped
- Salt and pepper
- 2 eggs plus 4 egg whites
- Skim milk
- Good quality Parmesan cheese

PREPARATION:

1. Preheat oven to 400 degrees. Grease frying pan (we used cooking spray, but feel free to use your favorite kind of cooking oil or butter) and heat to medium or medium-high. Add scallions, garlic scapes and stems of Swiss chard (they take longer to cook than the leaves do). Cook until tender (about 5 minutes). Add salt and pepper to taste.


2. Combine eggs, egg whites and skim milk in a small bowl and whisk until mixed.

3. Add Swiss chard leaves and parsley and cook until the greens are starting to wilt. Add egg mixture to frying pan. Cook for 1 or 2 minutes or until egg begins to set.


4. Transfer to 9 in. pie plate (unless using oven-safe pan, in which case you can just place it directly in the oven). Cover with parmesan cheese and bake for 10 minutes.


5. Serve with English muffins or toast. Enjoy!


This dish had a bit of a "woodsy" flavor that would definitely have been enhanced with the addition of some mushrooms - the whole time we were eating it, I kept wishing I had some in the house!

My rating: 9/10
Dan's rating: 8/10

Read more...

Steak Two Ways - R & J

Coffee-crusted ribeye and Rosemary ribeye, served alongside Swiss chard with bacon and salted baked potatoes...

Read more...

Free Cookbooks!

Some of you already know about my love for the public library, but for those of you who don't, I'm a big supporter of the library! Joining the library is almost always the first thing I do when I move to a new town - this move was no exception.

I discovered on Friday that our local library has a great collection of cookbooks, and I took these 2 out - I'm enjoying them so far! I'll keep you updated when I take out some more.
If you don't have a library card, you should get one - all you usually need to bring with you is proof of your residency in the town or city. It's free - why not?

While I'm on the subject, I recently discovered this blog which I think is awesome - check it out!

Read more...

R & J - Portuguese Beans with Linguica and Kale & Sauteed Kohlrabi

>> Friday, June 25, 2010

Sorry if these photos aren't up to the usual quality, I "borrowed" them from J's Facebook page...


I'm also guessing that the recipe is based off this one, but I can't say for sure!

Read more...

Penne with Pesto, Broccoli & Tomato

We used some of my pesto in tonight's dinner - YUM! The broccoli we used came from the CSA - it was quite tasty.


To finish off the pasta, we added some Parmesan cheese and black pepper...

Read more...

Basil Pesto

As promised, here is my pesto recipe and some photos...


Classic Pesto (from The All-New Complete Cooking Light Cookbook)

INGREDIENTS:

- 2 tablespoons coarsely chopped walnuts or pine nuts*
- 2 garlic cloves, peeled**
- 3 tablespoons extra-virgin olive oil
- 4 cups basil leaves (about 4 ounces)
- 1/2 cup (2 ounces) grated fresh Parmesan cheese
- 1/4 teaspoon salt

PREPARATION:

1. Drop nuts and garlic through food chute with food processor on; process until minced.

2. Add oil; pulse 3 times.

3. Add basil, cheese, and salt; process until finely minced, scraping sides of bowl once.

* I tried walnuts this time - I usually use pine nuts but I figured I'd see what it was like with something a little different - tastes just as good!

** Turns out that we were out of garlic (which I only discovered once I started making the pesto - I just used our garlic-infused olive oil instead, and it worked really well)

This pesto recipe is actually one of my favorites from this particular cookbook, and you can tell because the page is all wrinkled from where I've spilled on it. Oops. At least now the cookbook opens right to that page!


I just read an interesting technique on the Cooking Light website - it never occurred to me to blanch the basil before making this pesto, but it would help the pesto to stay greener. I'll have to try it next time!

The basil I used came from our herb garden - we had a much bigger garden last summer, but because of the move we've only been growing herbs this year. As you can see from the photo below, they're all doing really well (this was taken after I had already cut off the basil I needed for the pesto).

Chives, Sweet Basil, Purple Basil, Rosemary


We also have a separate pot with cilantro in it, but it didn't survive the move all that well. I think I need to re-pot it (or possibly just start with a new plant!). Eventually I plan to mount the window-box on the railing you see above it... (yes, K - this is the window-box you gave me when you guys moved, it's been great. THANK YOU!)

Read more...

Tilapia with Sesame Greens & Garlic Scapes


Our kitchen is finally unpacked enough that we could cook a real meal, and last night's dinner was great!

Sesame Broiled Tilapia (adapted from AboutSeafood.com)

INGREDIENTS:

- 1 lb. fresh tilapia fillets
- 2 tbs. butter, melted
- 1 tsp. fresh lemon juice
- 3 tbs. sesame seeds
- 1 tbsp. of soy sauce (our addition to the recipe)

PREPARATION:

1. Combine melted butter, lemon juice and soy sauce in a shallow dish and dip the fillets in the mixture. Place on a lightly greased ovenproof pan.

2. Broil under high heat about 2 minutes each side, basting with the butter/lemon mixture several times during the cooking process.

3. After the final baste, top fillets with sesame seeds. Broil an additional 1-2 minutes until the seeds are golden brown.


Sesame Greens with Garlic Scapes
(from Red Fire Farm)

INGREDIENTS:

- 1 bunch turnip greens
- 2 turnips or kohlrabi
- 1 bunch swiss chard (we used kale instead)
- greens from 1 bunch of beets
- 4 garlic scapes 1/8 cup oil
- 2 tbs. sesame oil
- 2 tbs. sesame seeds
- 1 tbs. tamari (soy sauce)
- 1⁄4 tsp. cayenne (opt.)


PREPARATION:

1. Chop greens, removing stems and chopping finely (they need more time to cook so if you want to use them you just have to start them earlier). Thinly slice turnips and cut scapes into 1 inch pieces.


2. In a wok or similar skillet, heat oil until hot and toss in turnips, scapes, and any stem pieces. Cook for 5 minutes.


3. Add beet greens and tamari, cover and cook another 5-10 minutes, stirring occasionally.

4. Add cayenne, sesame seeds, swiss chard, and turnip greens and cook until greens are wilted.


My rating: 8.5/10
Dan's rating: 8/10

One final note about fish - please do your best to buy sustainable seafood whenever possible! Click here to download a great pocket-sized regional list that you can bring with you to the grocery store (from the Monterey Bay Aquarium). They also have an IPhone app, which you can access here.

Read more...

Greens and Beans

I forgot to put up this post last week - Dan did make one other recipe using greens from our CSA. This is a recipe that we now make on a fairly regular basis - it was given to me a few months ago by an old friend. Thanks, JG! (this recipe is taken directly from an email she sent me - step 4 made me laugh out loud...)

INGREDIENTS:

- 2 tbs extra virgin olive oil
- 1 medium onion, chopped
- 3 cloves of garlic (but feel free to add more), chopped
- 1 bunch of fresh greens, such as kale, swiss chard, collards, broccoli rabe, etc- cut into thin ribbons
- 1 + 2/3 cups vegetable stock (or water)
- Two 14.5 oz cans cannellini beans, drained
- Salt and pepper
- Red pepper flakes

METHOD:

1. Heat oil in a 12-inch saute pan over medium heat. Add onion and garlic, increase the heat to med-high, and cook stirring frequently for about 5 mins.

2. Add the greens and stock/water to the pan, stir, cover, increase heat to high.

3. When the mixture comes to a boil, add the beans, and salt, pepper, and red pepper flakes to taste (you can also add the red pepper after cooking, if not everyone likes spiciness). Stir, cover, reduce heat to med-high.

4. Cook until the greens are tender- timing will differ based on the greens you choose. Start checking tenderness after 5 minutes. Unless you're using collards, in which case you might want to do some laundry before checking.

5. Serve topped with grated parmesan (if you want), and crusty bread.

Feel free to make this recipe your own - we usually mix it up a bit with various beans and different types of greens depending on what we have - this time Dan used both red and white beans.


Read more...

Local/Organic Ingredients

>> Thursday, June 24, 2010

Since we decided to join the CSA, I've been thinking a lot about the idea of local ingredients and trying to reduce our carbon footprint. While we haven't made as much head-way in this area as I wish we could, I do love discovering new things around us that make an effort to use local or organic products (or both!).

My parents were visiting last weekend to help us move into our new place, and we tried a vegetarian/organic restaurant in Lowell, MA - Life Alive. It was a bit of a new experience for all of us as their mission is VERY focused on the importance of whole living and healthy digestion, but the food was actually really good. I would definitely go back again - my salad was delicious and the menu offerings are quite varied. I especially liked that they made a point of using sustainable products - my smoothie was served in a Ball canning jar!

They're apparently opening a second location in Central Square (Cambridge) in the near future. Here's a link to their reviews on Yelp - it's gotten an average of 4.5 stars! You should definitely check this place out sometime.

When I come across other local or organic things, I'll make sure to post them here. Feel free to pass along your suggestions as well!

Read more...

This Week's Share - 6/23/10

>> Wednesday, June 23, 2010

  • Lettuce
  • Pearl Onions
  • Swiss Chard
  • Hakurei or Scarlet Turnips
  • Cilantro
  • Kohlrabi
  • Broccoli
There was actually less produce in the share this week than we've had the past 2 weeks. We took the onions, swiss chard, and broccoli, and R & J kept the kohlrabi and the lettuce. We split the rest. At least we still have a lot left from last week!

I'm making pesto tonight, I'll post the recipe and some photos in a little while!

Read more...

More from R & J

I'm jealous of the meals that J made this week with the produce - I wish we had had time to cook!

Ming Tsai's Asian Coq Au Vin with bok choy and sesame and scallion rice cakes:


Roasted Beet Risotto with beet greens and parsley & an endive, beet green, and scallion salad:

Read more...

This Week's Share - 6/16/10

So technically this should now say "Last Week's Share" because I'm posting this so late, but I swear I took these photos right after we got the harvest last Wednesday...


The share included:

Garlic Scapes (Green Garlic)


Kale


Kohlrabi


Scallions


Beets


Lettuce and Endive

Parsley


and last but not least...

Carrot


Oh, and here's a photo that J took after he got home from picking up our share. For more information about how the weekly pick-ups work, check out this great post from another Red Fire Farm CSA member.


Read more...

Blog template by simplyfabulousbloggertemplates.com

Back to TOP