A Culinary Experiment!

Documenting the ups and downs of our first CSA experience...
and our attempt to be more conscious of all things local!
Showing posts with label Recipes. Show all posts

Kale Chips

>> Monday, September 13, 2010

We have been wanting to try making kale "chips" all summer, but it hasn't worked out until now. They were really easy to make, and taste great! We overcooked them, so this photo doesn't do it justice, but now we know to bake them for less time the next time around (I think they were in the oven for 8 minutes, it might be better to bake them for about 6 minutes or so...).


Kale "Chips" (from Red Fire Farm)

INGREDIENTS
  • 1 lb kale, chopped
  • Olive oil
  • Salt
  • Pepper
METHOD

1. Preheat oven to 400˚.
2. Toss kale with olive oil, salt and pepper.
3. Spread out on a baking sheet and bake, turning every 5 minutes until brown and crispy. Kale should be dry and able to be eaten by hand like chips!

Read more...

Napa Cabbage

We got a head of Napa cabbage from the CSA a few weeks ago, but weren't sure what to do with it. We finally made it tonight, using a loose interpretation of this recipe for Warm Apple-Cabbage Slaw (I used cranberry juice and added Craisins). We served it with corn from the farm and oven-"fried" tilapia. It was a delicious meal!

Here are some photos:


I also considered a bunch of other recipes before finally choosing one:
You can find some great tips about how to cut cabbage here - I never knew that it can turn your knife black because of the chemical reaction when the cabbage touches something metal that's not stainless steel! (although this didn't happen tonight when I cut it and I don't think that our knives are stainless steel...)

Read more...

Braised Winter Veggies

>> Thursday, August 26, 2010

Our friends M and S recently gave us this recipe to try - they are big fans of the blog and have made several of my recipes, so I was excited that they gave me one in return. We haven't made it yet, but it sounds delicious (and came highly recommended!)...

INGREDIENTS:

- 2 medium carrots, peeled
- 1 medium parsnip, peeled
- 2 small turnips, peeled (about 8 oz.)
- 2 small onions
- 1 medium bulb fennel, trimmed
- 1 tbs. olive oil
- 1 bouquet garni (1 sprig fresh thyme, 1 bay leaf, and 4 parsley stems tied with twine)
- kosher salt and freshly ground black pepper
- 1/2 cup water (or 1/4 cup lower-salt chicken broth and 1/4 cup water)
- 2 tbs unsalted butter
- 2 tbs chopped fresh herbs (ex. a mix of parsley, thyme, and chives)

PREPARATION:

1. Preheat oven to 350 degrees. Cut carrots and parsnip on diagonal into 1 inch chunks.

2. Cut turnips and onions into wedges about 1 inch thick at their widest point. Split the fennel bulb length-wise, notch out the core and then cut the fennel crosswise into 1 inch slices.

3. Heat oil in a medium (9-inch) Dutch oven over medium heat. Add the onions and cook, stirring occasionally until softened and lightly browned (about 5 minutes).

4. Add the other veggies, the bouquet garni, 1/2 tsp salt, and pepper to taste. Raise heat to medium-high and cook until veggies are lightly browned (about 5-7 minutes).

5. Add water and bring to a boil. Cover pot, put in the oven and bake until veggies are fully cooked but still hold their shape (about 20-25 minutes). With a slotted spoon, transfer veggies to a serving bowl.

6. Bring pan juices to a boil until reduced to about 1/4 cup, discard the bouquet garni and whisk in butter and herbs.

7. Spoon the sauce over the veggies and serve!

I'm definitely going to try this once it gets a bit cooler outside...

Read more...

Apple Raisin Kugel

Ok, so I know that the following recipe has nothing really to do with the CSA, but it's one of my mom's oldest recipes (and one of my favorites!). A good family friend just asked me for the recipe, and it reminded me that everyone who tries it, loves it! (she's actually not even the first person who's asked for the recipe either...)

I've even started bringing it to Dan's family's Thanksgiving, and it's a hit all around!

Besides, it's got apples in it, and it's starting to feel like fall, so what's the big deal anyway? Right?

PS - If you've heard this called "Lokshen Kugel," that just means "noodle pudding" in Yiddish. Oh, and for those of you in the know, I believe that this recipe is originally from the Complete American-Jewish Cookbook (although my mom's copy is light blue, hard-cover, and easily falls open to this page the second you touch it - I told you it was a family favorite!).

INGREDIENTS:

- 1 8-ounce package egg noodles
- 1/4 cup oil
- 4 eggs, beaten
- 3 medium apples
- 1/4 cup seedless raisins
- 1/4 cup sugar
- 1 1/2 teaspoons salt
- 2 teaspoons cinnamon
- 1/2 teaspoon vanilla

PREPARATION:

1. Preheat oven to 350 degrees. Cook and drain noodles and put in a large bowl. Stir in oil and eggs.

2. Peel and chop apples. If using raisins, rinse in hot water and drain. (my sister HATES raisins, so sometimes my mom will leave them out - it's up to you.)

3. Combine all ingredients together, add seasoning and mix well.

4. Pour kugel mixture into a greased 9" x 13" baking pan. Bake for 40 minutes to 1 hour or until lightly browned.

Makes 12 pieces (notice I didn't say 12 servings - it's too good to eat just one piece!).

ADDITIONAL NOTES:

For extra softness, add another 2 eggs.

Variation: PINEAPPLE KUGEL - Replace apples and raisins with one 16 oz. can crushed pineapple. Add an additional 1/2 - 3/4 cup of sugar and 1 tablespoon cinnamon. (I personally like the apple version better, but that's just my two cents...)

Read more...

Broiled Tofu

>> Thursday, August 5, 2010

We've made tofu this way before, and it comes out really good and very flavorful. I wasn't always the biggest fan of tofu, but after we learned how to cook it properly, it's opened up a whole new world for us. Our version of broiled tofu is based on this recipe from Martha Stewart.

One piece of advice - cut your tofu thinner than you think you should (even into more pieces than this recipe says to). We didn't cut it as thin this time as we have in the past, and it never really got crispy on the outside. The flavor was amazing though, so it didn't matter all that much.

PS - Our new house has an electric oven, but we're both used to cooking with gas. The broiler in electric ovens is on the top of the oven, just in case you were wondering! That's all I'm going to say about that. :)

Read more...

What to Do with Mr. Zucchini?

>> Tuesday, July 27, 2010

We didn't end up using the zucchini from last week, so we now have 1 large zucchini and 2 smaller ones. I'm trying to decide what to make with them, and I'm leaning towards some sort of loaf bread.

As I've mentioned in the past, I LOVE to bake. I made a birthday cake for Dan's birthday last week (see the photo below), and it was so nice to be able to make something homemade again. Most of my baking supplies are still packed away from our move, but this will give me an opportunity to get them out!


Here are a few zucchini ideas I'm considering:

- Zucchini Blueberry Muffins
- Zucchini Cornbread
- Zucchini-Parmesan Loaf
- Yogurt Zucchini Bread with Walnuts
- Zucchini-Nut Bread
- Zucchini Orange Bread
- Two-Colored Squash Loaf Cake (I'll have to wait and see if we get any yellow squash tomorrow for this one)

My mom's friend used to make this amazing chocolate cake with zucchini in it, I'll see if I can get the recipe...

Read more...

No Cucumbers For You!

>> Thursday, July 15, 2010

I thought we were going to get cukes this week, so I found a bunch of recipes online that I wanted to try. Unfortunately we didn't get any, so I'll have to try them in the future (or I guess I could just buy some at the grocery store....). Tell me what you think!

Cold Cucumber Soup (Red Fire Farm)

INGREDIENTS:

- 5-6 cucumbers (peel if desired)
- 2 cups milk
- 1 cup sour cream
- 2 Tbs. chopped dill
- 1 tsp salt
- 2-3 cloves garlic
- 1 tsp minced mint
- 1 Tbs vinegar
- black pepper to taste

PREPARATION:

Place all but one cucumber in the blender and process until smooth. Chop remaining cucumber and add. Chill.

Other ideas:

Read more...

Reducing Waste

>> Thursday, July 1, 2010

I'm going to be taking a short hiatus from the blog in a few days, as we're going on vacation to the Pacific Northwest. We've been planning this trip for almost a year, and I'm so excited to get away! I have a feeling that we'll be eating a lot of sustainable and locally grown food in Portland and Seattle, as they seem to be up-and-coming food cities with lots of great environmentally-focused chefs. I'll be sure to take lots of photos to share with you when we get back!

As I sit here dreaming about everything we're going to do, I can't help but wonder how to use up all of the veggies in my fridge before we head out of town. Since I'm guessing it's not going to be possible, I've been contemplating ways to save the produce for later use. I would love to can them, but I don't yet have the supplies to do so (I'm hoping to spend some time later this summer experimenting with it, but I don't think that now is the time).

I have been able to successfully freeze herbs in the past, so I think I may try that with the herbs we have left (dill, cilantro, and parsley). It's actually really simple - wash and cut the herbs, and then place them in ice cube trays. Fill the rest of the tray with water (or oil, or any other cooking liquid, i.e. wine!) and freeze. Then when you need some for a recipe, just defrost or add directly to your pan. It helps if you measure a specific amount into each ice cube tray, so that you know how much is in there when you need it later for a recipe. (as a side note, I also do this with leftover coffee, because then I can make iced coffee and not have to worry about it getting watered down when the ice melts!).

But I was wondering if it's possible to freeze other veggies, and I've discovered that it is! This website is a great resource for how to freeze specific types of produce.

I also think I'm going to make pickles out of the cucumbers we got from this week's harvest. My mother-in-law makes great refrigerator pickles, here's her recipe (I may even try to use fresh dill in them, although I've never done that before):

Pickled Cucumbers

INGREDIENTS:

- 1/2 cup water
- 1/2 cup vinegar
- 1/2 cup sugar
- 1/2 tsp. celery seed
- 1/2 tsp. dill weed
- 1/4 tsp salt
- 1/4 tsp black pepper
- 1-2 garlic cloves, crushed

PREPARATION:

1. Combine ingredients in a jar.

2. Slice 2 cucumbers and add to mixture.

3. Marinate in refrigerator. Best if at least 6 hours - 12 hours.

Any ideas on other ways to preserve our veggies if we can't use them right away?

Read more...

Beets and Carrots in a Lime Vinaigrette

>> Wednesday, June 30, 2010

I've never really been a big fan of beets, but I decided to give them a try again by making them at home. We saved our beets from the last time we got them from the farm, and I got more today so I was able to use a lot of them! I discovered once I cut into them that today's beets were actually striped, which I think is pretty cool. I wish I had taken a photo of them cut open. I'll do so if we ever get them again! I think they might have been chiogga ("candy-striped") beets, but I'm not sure. Anyone know if there are other varieties of striped beets?

Anyway, here's the recipe I made tonight (we're going to have it as a side dish tomorrow for dinner, but I was afraid that it might not look as pretty by then because of the beet juice...):

Beets and Carrots in a Lime Vinaigrette (Red Fire Farm)

INGREDIENTS:

- 2 medium beets, peeled and cubed
- 2 medium carrots, sliced diagonally
- 1 medium cucumber, cubed
- 6 Tbs veggie oil
- 3 Tbs lime juice
- 2 Tbs chopped cilantro or dill
- 1 garlic clove, minced
- salt to taste

PREPARATION:

1. Steam beets and carrots separately until tender.*
2. Combine dressing ingredients (they suggested that a jar works well because you can put the lid on and shake it all up.)
3. Put the veggies, including the cucumber in a bowl and toss with dressing. Chill.

Before adding the dressing:

All finished!

* As you can see below, I like to steam my veggies in a pot with a steam basket. I found this great silicone one that molds to the shape of just about any pot - you can probably find it at most housewares stores. (you can also steam veggies in the microwave - put just a little water in the bottom of a bowl and cover with plastic wrap. I'm guessing that this way is not as nutritious, but I don't really know for sure... and I do this when making frozen veggies)

Finally, here are a bunch of other recipes I considered making before selecting this one:
Oh, and if we ever get golden beets, I want to make this recipe!

Read more...

Not-So-Healthy But Super Tasty Nachos

>> Tuesday, June 29, 2010

As I'm sure you've guessed from my previous posts, Dan and I tend to eat pretty nutritious meals most of the time. But sometimes you just have to give in to those cravings for comfort food, and nachos are one of our favorite "guilty pleasures."

We've "perfected" our recipe enough that now when I order them in restaurants, I usually find I don't like them as much as the ones we make at home. That's gotta be a good thing, right? Besides, I tell myself that these have to be healthier than what I'd get in a restaurant, just by the sheer fact that we're making them ourselves!!!!

We decided to make them last night using a few of our remaining CSA ingredients from this week - we were able to include pearl onions and cilantro! Here's what else we used:

- Green and red peppers, chopped
- Morningstar Farms Grillers Crumbles
- Wegman's* Garlic Lime Salsa
- Black beans
- Nacho chips
- Reduced-fat 4-Cheese Mexican Shredded Cheese


We use Morningstar Farms Grillers fairly often, but we've discovered that they taste A LOT better when you combine them with some sort of liquid. In this case, we mixed the salsa and the Grillers together, and then heated them briefly before adding them to the nachos.

We've also found that the best way to make this dish is to do it in layers - we started with a layer of chips, then a layer of the Grillers/salsa mixture and black beans.


Then we added another layer of chips, topped with the peppers, onion and cilantro (which we mixed together beforehand).


Cover with shredded cheese, and bake for 10 minutes at 400 degrees. Voila!


I do love how colorful the end result was... and if you don't want to eat so many nacho chips, we've also made this recipe by creating a "dip" of all of the ingredients and then putting it on top of just a few chips.

* PS - We LOVE Wegmans. The grocery store chain started in upstate NY, where we both went to college. There was a rumor that they were opening a few stores in the Boston area, but it has been on hold for a while because of liquor license issues. According to this article, they are still planning to come to our area next year or in 2012. I can't wait!

Whenever we're near a Wegmans, we always stock up on a few products, especially this particular salsa. It's great! NPR had a story about Wegmans a few months ago - you can read it here. Oh, and they were listed as the #3 company to work for in this year's 100 Best Companies from Fortune Magazine.

Read more...

R & J - Kohlrabi Ham Souffle

Here's the recipe. R said was "amazing."

I don't eat ham, but it looks really tasty for those of you who do - enjoy!

Read more...

Swiss Chard, Scallion and Garlic Frittata

>> Monday, June 28, 2010

Egg dishes are another staple in our household. Because of this, we often try to limit the number of whole eggs we use when cooking. We've discovered that if you replace some of the egg with just whites, you usually don't notice the difference. (I find that it's a lot easier to separate the whites from the yolks if you use a separator - they're really cheap and you can find them at most stores that carry housewares.) If you find that this dish is not flavorful enough, feel free to use all whole eggs. Just lower the amount accordingly...

Frittatas are really simple, and they're great because you can use any combination of ingredients you'd like. I'm a breakfast person, I would eat it for every meal if I could, so to me this is the perfect dinner-time dish. If you ask my sister though, she'd think you were crazy! She doesn't like eating breakfast in the morning, so she'd hate this meal as supper. To each his (or her!) own - you decide for yourself.

I didn't list the amounts of most of these ingredients because we were making it up as we went along, but it really doesn't matter... oh, and the first four ingredients below came from our CSA!


INGREDIENTS:

- Swiss chard, leaves and stems separated and chopped
- Garlic scapes, chopped
- Scallions, chopped
- Parsley, chopped
- Salt and pepper
- 2 eggs plus 4 egg whites
- Skim milk
- Good quality Parmesan cheese

PREPARATION:

1. Preheat oven to 400 degrees. Grease frying pan (we used cooking spray, but feel free to use your favorite kind of cooking oil or butter) and heat to medium or medium-high. Add scallions, garlic scapes and stems of Swiss chard (they take longer to cook than the leaves do). Cook until tender (about 5 minutes). Add salt and pepper to taste.


2. Combine eggs, egg whites and skim milk in a small bowl and whisk until mixed.

3. Add Swiss chard leaves and parsley and cook until the greens are starting to wilt. Add egg mixture to frying pan. Cook for 1 or 2 minutes or until egg begins to set.


4. Transfer to 9 in. pie plate (unless using oven-safe pan, in which case you can just place it directly in the oven). Cover with parmesan cheese and bake for 10 minutes.


5. Serve with English muffins or toast. Enjoy!


This dish had a bit of a "woodsy" flavor that would definitely have been enhanced with the addition of some mushrooms - the whole time we were eating it, I kept wishing I had some in the house!

My rating: 9/10
Dan's rating: 8/10

Read more...

Tilapia with Sesame Greens & Garlic Scapes

>> Friday, June 25, 2010


Our kitchen is finally unpacked enough that we could cook a real meal, and last night's dinner was great!

Sesame Broiled Tilapia (adapted from AboutSeafood.com)

INGREDIENTS:

- 1 lb. fresh tilapia fillets
- 2 tbs. butter, melted
- 1 tsp. fresh lemon juice
- 3 tbs. sesame seeds
- 1 tbsp. of soy sauce (our addition to the recipe)

PREPARATION:

1. Combine melted butter, lemon juice and soy sauce in a shallow dish and dip the fillets in the mixture. Place on a lightly greased ovenproof pan.

2. Broil under high heat about 2 minutes each side, basting with the butter/lemon mixture several times during the cooking process.

3. After the final baste, top fillets with sesame seeds. Broil an additional 1-2 minutes until the seeds are golden brown.


Sesame Greens with Garlic Scapes
(from Red Fire Farm)

INGREDIENTS:

- 1 bunch turnip greens
- 2 turnips or kohlrabi
- 1 bunch swiss chard (we used kale instead)
- greens from 1 bunch of beets
- 4 garlic scapes 1/8 cup oil
- 2 tbs. sesame oil
- 2 tbs. sesame seeds
- 1 tbs. tamari (soy sauce)
- 1⁄4 tsp. cayenne (opt.)


PREPARATION:

1. Chop greens, removing stems and chopping finely (they need more time to cook so if you want to use them you just have to start them earlier). Thinly slice turnips and cut scapes into 1 inch pieces.


2. In a wok or similar skillet, heat oil until hot and toss in turnips, scapes, and any stem pieces. Cook for 5 minutes.


3. Add beet greens and tamari, cover and cook another 5-10 minutes, stirring occasionally.

4. Add cayenne, sesame seeds, swiss chard, and turnip greens and cook until greens are wilted.


My rating: 8.5/10
Dan's rating: 8/10

One final note about fish - please do your best to buy sustainable seafood whenever possible! Click here to download a great pocket-sized regional list that you can bring with you to the grocery store (from the Monterey Bay Aquarium). They also have an IPhone app, which you can access here.

Read more...

Ethiopian Honey Yeast Bread

>> Wednesday, June 23, 2010

Sorry for the lack of posts this week, Dan and I moved into our new house on Saturday and it's been quite hectic around here. We've barely used anything from last week's CSA, but I'll update the blog as soon as I can... especially since our next harvest pick-up is today!

In the meantime, here's a recipe that my mom just emailed me. Her friend (an amazing baker) made this bread for their book club meeting last night (they like to eat food related to the book they've read each month - I love the idea). I haven't tried the recipe, but apparently the bread got rave reviews among my mom's friends. Enjoy!!!

Yemarina Yewatet Dabo (Ethiopian Sweet Bread)

INGREDIENTS:

1 yeast packet
1 egg
1/2 cup honey
1 tablespoon coriander
1 teaspoon cinnamon
1/2 teaspoon cloves
1 teaspoon salt (she used 1/2 tsp.)
6 tablespoons butter, melted
1 cup warm milk (she used fat free)
4 to 5 cups flour (she used bread flour, King Arthur's)

METHOD:

1. Stir yeast in 1/4 cup warm water in small bowl, let stand for 10 minutes.

2. In large bowl, beat egg, honey, spices and salt until smooth (she used a whisk).

3. Stir in milk and melted butter and yeast.

4. Stir in flour 1/2 cup at a time until soft, smooth dough. Add more or less as needed;
Knead on board for 10 minutes.

5. Place in large, lightly oiled bowl. Cover with plastic; let rise 1 and 1/2 hours.

6. Remove to board, punch down and knead one minute.

7. Form dough into a round and place on oiled baking sheet.

8. Cover with towel and let rise 30 to 45 minutes.

9. Preheat oven to 325 degrees. Brush top with egg and a little milk mixture.

10. Bake uncovered 45 minutes to 1 hour until lightly brown.

Read more...

Formula for Our Favorite Stir-Fry

>> Monday, June 14, 2010

We have several go-to recipes in our cooking arsenal, and stir-fry is one of them. I'd say we probably make it about once a week or once every couple of weeks, so we've gotten pretty good at it. We never really make the same recipe twice, because it depends a lot on what veggies we add and the liquid we use to cook it... here's how we did it tonight!

Ingredients (definitely feel free to mix it up!):

Zucchini
Yellow Squash
Red Pepper
Green Pepper
Bok Choy
Green Garlic
Chives (from our garden!)
Cooking oil
Ken's Lite Asian-Sesame Dressing
Pineapple juice
Sriracha (Thai hot sauce)
Low-sodium soy sauce
White Rice

1. Cook rice according to package directions. (We normally use brown rice because I don't particularly love white rice, but we're moving this week and our pantry is more limited than usual. If using brown rice, be prepared for a longer cooking time!)

2. Drain tofu and slice into 6 even-sized slices. Press tofu between 2 baking sheets lined with paper towels. Use a heavy object to apply pressure (there will be a fair amount of liquid displaced from the tofu). We used a watermelon!

3. Cut each tofu slice into approximately 15 cubes, for a total of 90. Heat oil on HIGH and cook tofu, stirring occasionally until golden brown. Add whatever seasoning you'd like while tofu is cooking. We used soy sauce, but you could just use salt and pepper.


4. Chop vegetables and set aside (Dan tends to cut our stir-fry veggies into the shapes you find them in restaurants, but you can really do it however you like).


5. Once tofu is browned, remove from pan and set aside. Add more oil to the pan and cook vegetables (start with veggies that take longer, such as carrots or peppers and then move on to those that are softer/have shorter cooking times).


6. While the veggies are cooking, add flavoring liquids to taste - we usually use a combination of soy sauce, Asian-Sesame dressing, Sriracha (Thai hot sauce), and pineapple juice. Again, this really depends on your personal preference. If you choose to use Sriracha, be aware that a very small amount goes a long way - it's quite spicy!


5. Combine the veggies with the rice and serve!


My rating: 8.5/10
Dan's rating: 8/10

Read more...

Green Garlic, Dill, and Fresh Vegetable Quiche

>> Saturday, June 12, 2010

Dan made brunch this morning, and it was AMAZING! I tried to recreate the recipe here, but it's somewhat approximate. I don't think it really matters though - feel free to tweak it to your own tastes!


Adapted from Better Homes and Garden New Cookbook, Bridal Edition^
Serves 6

Ingredients:

1 pre-made pie crust*
1/2 red pepper, chopped
1 cup artichoke hearts, chopped
2 tbsp fresh dill, chopped**
1 green garlic stalk and bulb, chopped
3/4 cup feta cheese
1/2 cup skim milk
6 egg whites
Salt and pepper to taste

1. Preheat oven to 325 degrees.

2. Combine all herbs and vegetables in a medium bowl.

3. In a separate bowl, scramble egg whites and milk. Add 1/2 cup feta cheese, salt and pepper. Add to herb and veggie mixture and mix gently.

4. Pour into pie crust. Add the rest of the vegetables and then top with remaining 1/4 cup feta cheese.

5. Place pie crust on a baking sheet to catch any drips. Bake approximately 45 minutes, until crust is golden brown and a knife inserted into the center comes out clean.

^ We got this cookbook for our wedding 2+ years ago, and we LOVE it - I would definitely recommend it to newlywed couples. It's got tons of great tips and basic recipes that you can make your own. Our copy is well-used!

* Yes, I know some of you are probably cringing at the idea of using ready-made pie crust, but I find that it actually tastes better than some of the homemade crusts I've made. It's also a lot faster!!! :) Oh, and the New York Times even said it's alright!

Maybe next time I'll try making my own crust, but in the meantime, we're partial to Oronoque Orchards Deep Dish crusts - they're kosher, so there's no lard! You can find them in the freezer section.


My rating: 8/10
Dan's rating: 8/10

** we're not positive that he used 2 tbsp of dill, but the amount that we did use was a little overpowering - next time we'll cut it back just slightly.

Read more...

Mediterranean Salad

>> Friday, June 11, 2010

Tonight we used the mixed greens and carrot from our CSA to make a great salad! It also included almonds, feta cheese, kalamata olives, cucumber and red pepper.


The dressing was olive oil, pepper, and 12-year-aged balsamic vinegar from Fiore Artisan Olive Oils and Vinegars in Bar Harbor, ME. We stopped there on a trip last summer and sampled all of their oils and vinegars. Delicious!


Read more...

Sautéed Hakurei Turnips & Braised Greens

>> Thursday, June 10, 2010


Ingredients:

1 Bunch Hakurei Turnips with greens (we also used potatoes - see below)
1 lb Greens such as Chard, Mizuna or Braising Mix
2 tsp oil, divide
½ cup water, apple juice or white wine
½ tsp salt
¼ tsp black pepper


Method:

1. Cut the greens from the turnips. Wash and tear all the greens into large pieces and remove the stems. Cut the turnips into bite sized pieces.


2. Heat 1 teaspoon of oil in a sauté pan over medium-high heat. Sauté the turnips stirring or tossing occasionally until they are crispy outside and tender inside.


3. Season with salt and pepper and remove to a warm plate. In the same pan, heat the remaining oil over medium heat.

4. Add the washed and wet greens to pan in batches. Stir and mix as they wilt. Add the wine or other liquid and cook until it is mostly evaporated.


5. Plate greens and arrange the warm turnips on top. Enjoy!


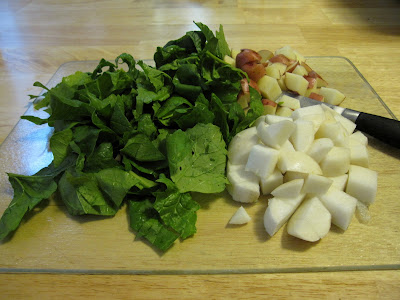
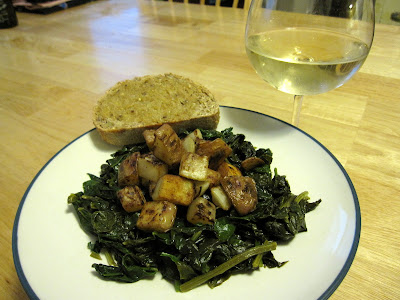
Unfortunately we had to supplement the turnips in this recipe with red potatoes - we only had 2 turnips! (since we're splitting the farm share with R and J and this week's total portion of turnips was only 1 bunch). Luckily J and I found a bunch that had 4 turnips in it - most of them only had 2 total turnips. Hopefully this won't be a problem as the season continues and there's more quantity of specific produce available from the farm per week.

For the "greens," we used spinach from the CSA as well! We didn't love it nearly as much as the turnips though; it was very bitter (most likely due to our cooking and not the spinach itself - it tasted good when it was raw).

In case you were wondering, the wine we used in the recipe was A to Z Oregon Pinot Gris - we're actually going on vacation to the Pacific Northwest later this summer, and are trying to get a sense of wines we like from Oregon before we go!

My rating: 7/10 - mostly due to the turnips!
D's rating: 6/10 - "I would DEFINITELY make turnips again..."

Finally, here are some other turnip recipes we considered making:

- Turnip Griddle Cakes
- Turnip Gratin
- Mashed Turnips
- Herbed Couscous with Green Garlic and Hakurei Turnips (3rd recipe from the bottom)
- Young Turnip and Goat Cheese Gratin

Read more...

Blog template by simplyfabulousbloggertemplates.com

Back to TOP